

 Go inside Riviera Country Club, the most exclusive clubhouse in golf
Pick the perfect par 4! Help decide the winner of the GOLF + Nicklaus Design Challenge
When we began soliciting entries for the inaugural GOLF Magazine + Nicklaus Design Challenge earlier this year, we weren’t sure what to expect. Pencil sketches on cocktail napkins? Golden Tee screen grabs? What we received — both in our inbox and mailbox — was a flood of thoughtful, imaginative and sharply designed par 4s. In all, we fielded nearly 200 entries, ranging from tantalizing to just plain tough. The experts at Nicklaus Design, our 8AM Golf sister company, collaborated with a handful of GOLF editors and writers to narrow the field down to 10 finalists, and now we need your help in deciding the winner.
Below you’ll find our finalists, including brief (and lightly edited) explanations from the designers on the strategy behind their holes. (We’ll be providing more background on each design and designer in the coming days.) After you’ve perused each sketch, scroll to the bottom of the article and vote for your favorite design. The people’s choice, paired with another round of voting from our experts, will determine the champ.
There’s much at stake — the winning design, which will be announced on or before May 15, will inspire an actual hole on an upcoming Nicklaus Design course — so please cast your vote with care!
Without further ado, our 10 finalists…
Design 1: Tim Bailey
There are three ways to approach my hole from the tee. (1) The conservative approach is a tee shot the middle of the fairway. Your next shot requires a long iron or fairway wood to be shaped to get close to the pin. And don’t be fooled by the deep bunker 50 yards short of the green. You still have a long way to go. (2) The slightly bolder line is to play your tee shot as close as possible to the stream on the left of the fairway. This gives you a straighter shot into the green, albeit slightly longer than the other strategies. Depending on the hole position, this strategy will be quite successful. (3) The most aggressive play is to bomb your drive over the stream crossing the fairway; the position of the tees allows any level of golfer to “have a go” at clearing the stream. This bold drive allows you to attack the green with a wedge or short iron. However, your approach shot is potentially blind depending on the pin placement. This strategy also requires a straight tee shot due to the natural winding of the stream.

Design 2: Todd Bramwell
My dream par 4 is based on a topographical map featuring softly rolling gradient, marked with berms and swales. The hole is laid out on a soft ridgeline that promotes a risk/reward decision off the tee, and rewards more aggressive play with a more open line of play through the green. I wanted to create a hole with some drama, but not at the expense of a “safe” play from tee to green.
The gently sloping terrain lends itself to a clear line of sight for players. A gently downhill tee shot transitions to an uphill approach, with the slope of the shot determined by the aggressiveness (and success) of the player’s line off the tee. From there, the challenge becomes navigating a green with a false front and trouble long. Fairway and green width is a bit deceptive due to contours and slope, making them both play smaller. Players who can shape their shots in both directions will have more success, especially with a prevailing northwest wind.

Design 3: Trevor Hansen
I envision this hole being on an all-sand site, either near an ocean or in an interior sand belt. It is a short par 4 that can be driven when the tees are moved up. The entire hole is short cut, with no rough, and with tees, fairway and greens all blending seamlessly together. The bunker/waste areas are reminiscent of Royal Melbourne’s, with smooth edges on the hole side and steep faces. The outside edges should blend seamlessly into the surrounding dunes, a la Tara Iti.


Design 4: Grant Lau
This hole is inspired by a piece of land in Nova Scotia, Canada. In the right wind conditions or from a forward tee, the aggressive golfer can look to drive the green. The tee shot is downhill over a rocky coastline into a landing area guarded on the left by a large fairway bunker and granite outcroppings and on the right by a small water hazard. The more conservative golfer can aims further right toward the fairway that is raised above the level of the green. The landing area is considerably wider and the golfer only needs to contend with the first fairway bunker and the coastline on the left.
The further right the tee shot, though, the more difficult the approach. The green becomes shallower from the right side of the fairway and the water hazard and right greenside bunker front the green. The approach remains playable for shorter hitters as the slopes to the left of the green can feed a running shot rightward onto the putting surface. Golfers with local knowledge can also leverage these slopes as backstops for their approaches. The green is multi-tiered, sloping generally from left to right and from front to back. The plateau on the left side and the runoff over the back provide challenging pin positions.

Design 5: Arno Kamphuis
My design is a risk-reward hole set in a sandy forest with naturally occurring mounts, hollows, meres and waste areas with loose sand created during the last ice age. The fairway of this dogleg right consists of two parts divided by a naturally occurring waste area. The default route on this hole is to play along the first part of the fairway. The natural hills at the end of this fairway will aid the player in positioning the ball in the elbow of the dogleg. From there, the remaining 170 yards to the middle of the green is relatively straightforward, inviting the player to play a slight draw into the green with the help of the prevailing wind from the right.
With some extra risk, the player could decide to hit the tee shot over the waste area, trying to reach the second part of the fairway. Clearing the waste area and avoiding the fairway bunker in the middle leaves players with a much shorter and easier approach of about 110 yards. This might look like the best option in all situations. But when the pin is situated on the right side of the green, this risky tee shot might result in a blind and difficult approach over the trees with the prevailing wind pushing the ball toward the mere. In short, this hole requires some careful course management for all skill levels.

Design 6: Keith Maysey
The picturesque 18th hole at Tombstone Valley measures 424 yards from the back tees. Right off the bat, players of any skill level are left with a choice off the tee: You can either play right, in hopes of catching the large swell down to the safe confines of the ample fairway or direct the tee shot in route of the skinnier left fairway to take advantage of the shorter approach shot. If your tee shot safely finds the right fairway, a likely mid- or long-iron awaits you on the approach shot to ensure you safely clear the wood-plank-lined manmade lake.
If you opted to go for the short shot in and make it down the left side of the fairway, you now have taken the vast majority of the lake out of the shot and enjoy the benefit of visualizing the widest portion of the green On the green, you will notice to larger lobes on both back sides. These two levels both funnel down to the center of the green. With the right pin placement, skillful approach shots will make for an exciting finish to any round.
ADVERTISEMENT


Design 7: Bryan Orellana
The inspiration for this design comes from the natural sand dune landscape of middle Wisconsin. This design is intended to meander between several large prominent sand dunes. The elevated tee shot presents several choices: (1) Layback and have a difficult partially obstructed approach over a huge bunker/dune, (2) play a draw and utilize the slope of the fairway to thread the gap between the bunkers, or (3) blast a bold high power-fade over the left fairway bunker and leave yourself a short iron uphill to a green complex that has more than what meets the eye.
From the fairway, the green will appear to be half the width. The lip of the huge bunker flowing out of the dune partially hides the right side of the green. In conjunction with the front bunker, the back bunker makes it appear impossible to have more green to the right. Although the right side of the green complex may appear to be daunting, the golfer has the opportunity to utilize the kicker slope right of the green to get the ball close. The back half of the green may be more perilous with a shallow plateau leading to the back of the green sloping away. On any given day, all hole locations present a fun challenge, but a middle pin may present the best opportunity to get it close since the surrounding slope will funnel any approach to the hole.


Design 8: Matthew Seybert
To post a score on the “Fried Egg” a player must approach the hole from the proper angle. A dramatic dogleg and a pronounced knob in the center of the green discourages a “grip it and rip it” and “aim for the center of the green” strategy. A high-flying approach into the center of the green could carom in any direction, its fate decided by a matter of inches. Instead, players need to position themselves off the tee with a clear angle to the hole depending on which of the four pinnable sections of the green the hole is cut.
The shape and topography of the green allows for aerial and ground approaches to all pin locations. An open green front allows players of all skill levels to run their approach shots onto the green. An aerial approach to front pins requires precision to stay in the proper green section. To reach a back left pin, the tee ball must hug the waste area located inside of the dogleg. A back right pin requires a longer tee shot which is tight to the left side of the fairway. The two primary tee shot corridors are visually framed from the tee by erosion style bunkers that rise dramatically out of the waste area. The left route is marked by a clean runway of fairway, while the shorter right path demands a carry of the waste area or an uncertain lie for the approach to the green.

Design 9: Daniele Smith
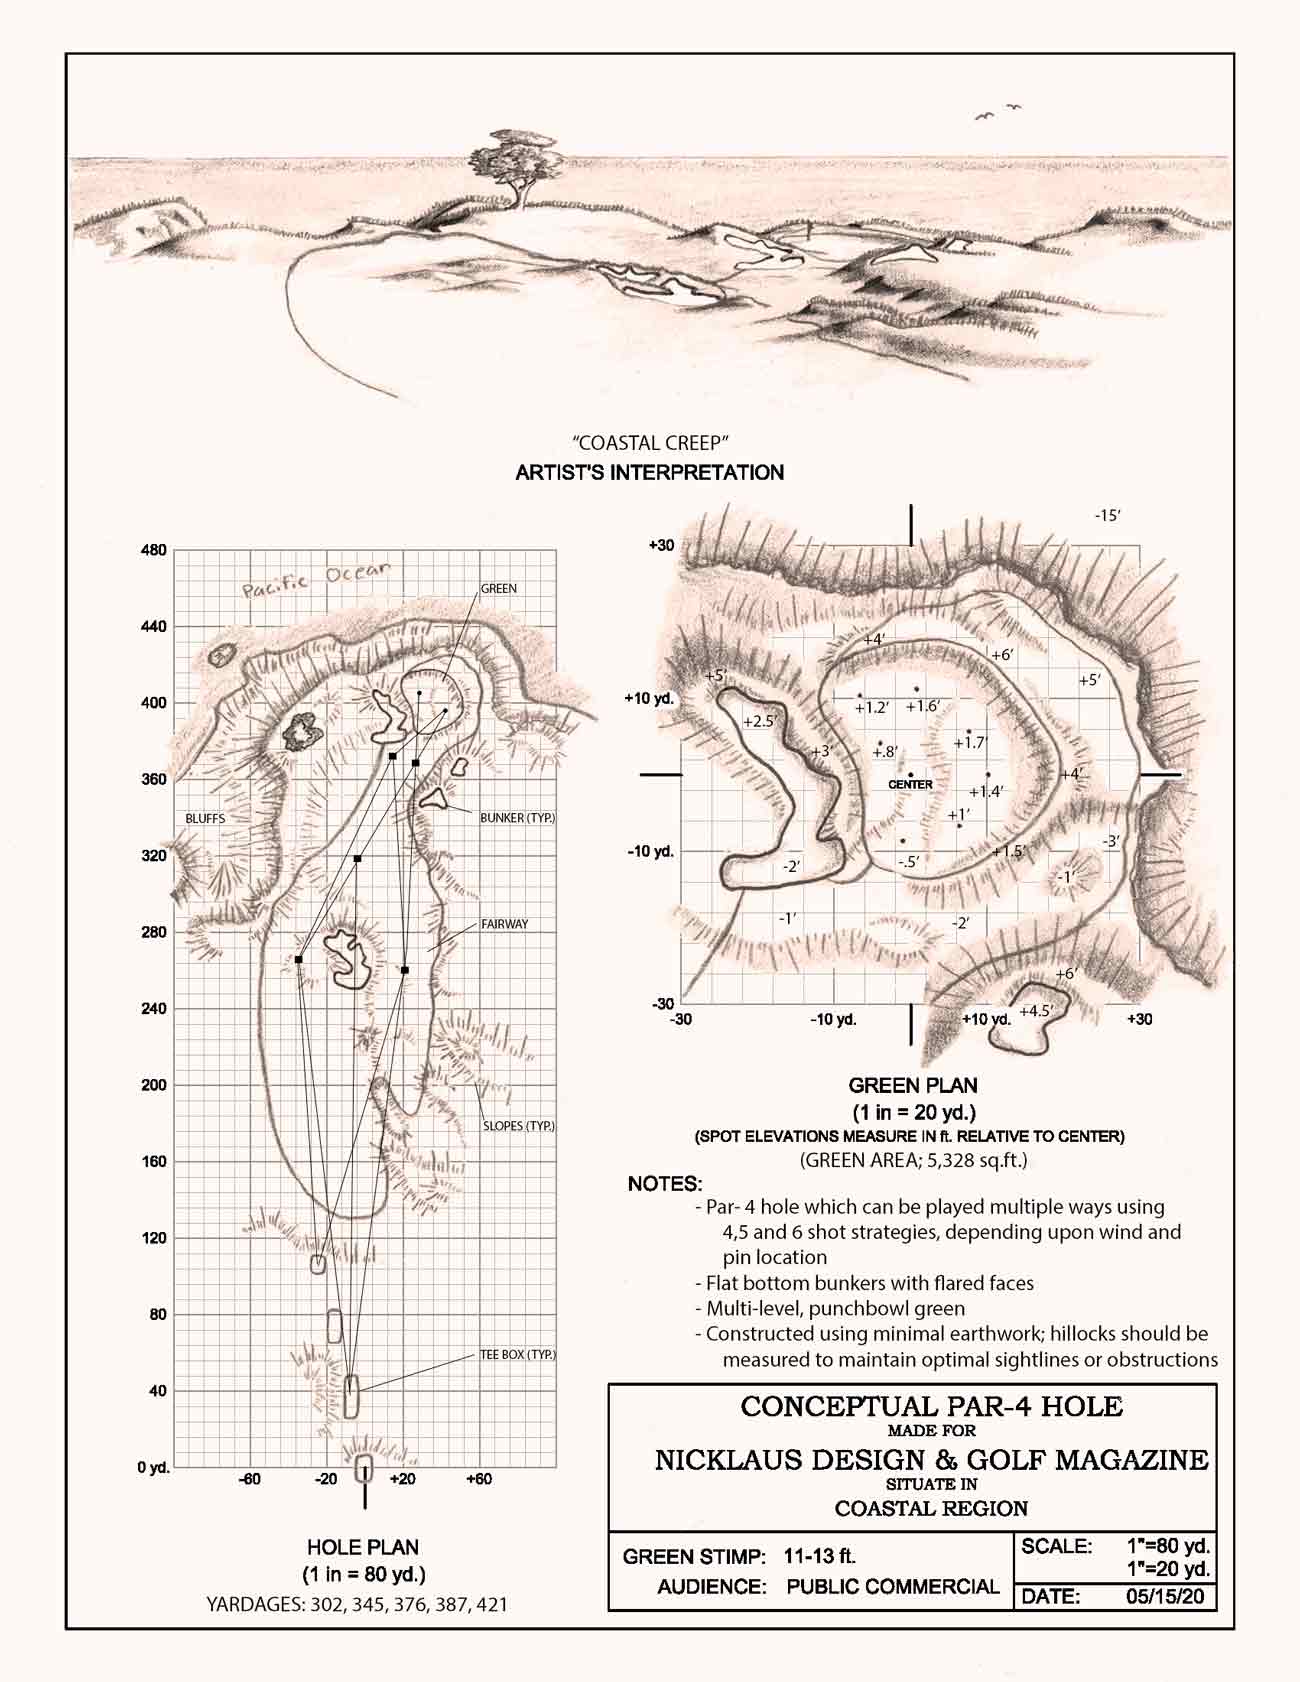
The ideal par-4 hole should be strikingly beautiful, strategic, engaging, and grow on the player each time around. Set alongside a Pacific bluff, the bunkers, hillocks, and undulations of Coastal Creep are natural slopes and former dune ridges, with a stacked and visually deceptive appeal. Together, these features create three major playing alleys, each presenting its own advantages for approaching the multi-level, punchbowl green. The variety of wind and pin locations will likely reward a different club selection each time.
This hole was designed from green to tee. The slopes of the putting surface, albeit highly receptive, only appear as an angel on your shoulder when approached from the correct angle or trajectory. Holes cut on the back-left portion of the green should be approached from the low lying, right-hand section of the fairway, where a leap of faith between hillocks is a typical shot from the tee. Holes on the right half of the green require the player to challenge a deceptively split fairway bunker for a better angle. Being conscious of your abilities and strategy persists through the multi-level, punchbowl green. Often, players faced with a putt or pitch across different portions of the complex must choose between an aggressive, fast line, or a more conservative bank shot. Combine that with a proper line of play to the green and there is no reason why any player should walk off without a smile on his or her face.
Design 10: Chance Williams
Width and freedom to choose your own line of play are the defining philosophies of this par 4. The fairway stretches just over 80 yards at its widest point, giving the golfer ample room to maneuver. A large waste bunker and a smaller bunker beyond protect the left side of the fairway. The waste bunker must be carried from the back tee to reach the left side of the fairway. These bunkers protect the best angle to the green, as three bunkers guard the right and front-right portions of the green. The fairway sits on a slight ridge, which kicks drives left or right depending on the portion of the fairway hit, and also adds slope to fairway lies.
The memorable feature of this hole is a large depression on the right side of the fairway approaching the green. This depression adds distance to long drives, but directs the ball to a less-attractive approach angle 10 feet below the level of the green. The green surface slopes front-left to back-right, with a bowl on the front-right. Players coming in from the left side of the fairway will be in the best position to attack right-hand pins, whereas players approaching from the higher portion of the right side of the fairway will be in a better position to attack the slope for left-hand pins. Two humps on the front-left of the green will aid deft running approaches, while guarding left-hand pins from the left side of the fairway.


[IT_EPOLL id=”15380923″][/IT_EPOLL]
ADVERTISEMENT
Go inside Riviera Country Club, the most exclusive clubhouse in golf
 Why this ‘noxious weed’ will give U.S. Women’s Open players fits
 5 reasons you should consider a golf vacation
 How walking could lead to lower scores (and the handy items you’ll need)
 Why Omni La Costa shines as a group and family getaway
Go inside Riviera Country Club, the most exclusive clubhouse in golf
Why this ‘noxious weed’ will give U.S. Women’s Open players fits
5 reasons you should consider a golf vacation
How walking could lead to lower scores (and the handy items you’ll need)
Why Omni La Costa shines as a group and family getaway
Why Omni La Costa shines as a group and family getaway
Go inside Riviera Country Club, the most exclusive clubhouse in golf
Why this ‘noxious weed’ will give U.S. Women’s Open players fits
5 reasons you should consider a golf vacation
How walking could lead to lower scores (and the handy items you’ll need)
Why Omni La Costa shines as a group and family getaway